| PLANS: final assembly |
| plans | ||||||||||||||
|
||||||||||||||
| resources | ||||||||||||||
| gallery | ||||||||||||||
| faq | ||||||||||||||
|
|
You now have all the pieces and can put the whole thing together! |
|
 |
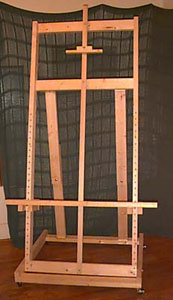 |
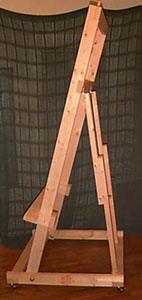
| fig. 1: side angle | fig. 2: front angle |
|
Now you need to screw the main support into the base. You'll want the easel against a wall, or actually, a doorway works well, so you can get behind the easel easily. This way the main support has something to rest on. Take your 4" x 1/2" bolt and stick it into the hole so it just pokes through the other side of the base. Then get one of your washers and hang it on the bolt so that it obscures the bolt. Then you can slide the main support into place. Wiggle around a bit and you should be able to get the bolt all the way through the main support. On the other end, place another washer, and then a 'locking' hex nut. The locking nut 'locks' because it has a bit of nylon on the outer end, which gives it some good anti-slip once it's on (you can still remove it if you need to). Lock-tight or other similar products would work here as well. Follow the same procedure for the other bolt on the other side. Now you want to add the rear supports. If you followed the directions previously, you have hinges screwed to the supports already. Now you need to screw the other end of the hinge into the appropriate place on the base for the 37" pieces, and the second horizontal piece on the main support. Look back at the diagrams in 'rear supports' if you don't remember (the placement of the hinges is presented there in fig. 3). Once you have the hinges screwed in, you can put the carriage bolt of each top piece into the slotted bottoms pieces--add a washer and your wing nut. If you didn't actually screw on the shelf before, now's the time to do it. Place the U-shaped pieces around the vertical pieces on the main support. Place the shelf into place--measure each side to make sure you have it centered, and put a couple screws on each side to screw the shelf onto the U-shaped pieces. If you haven't already, go ahead and slide
the clamp onto the center support... CONGRATULATIONS!!!! You should now have a fully-functional, massive, heavy-duty easel to provide a lifetime of painting support. All for less than $100 in materials. If you are so inclined you could even stain and varnish it at this point. I didn't bother since it's going to (already is, actually) get covered in paint anyway. I encourage you to visit the other areas of the easel site. The resources page gives hints about where to buy everything you need. The gallery page has photographs and emails from previous users of this site--these easels have been built around the world! The faq page, strangely enough, contains 'frequently asked questions.' And finally, there's the author page. If you're curious why I'd bother doing this or wonder who I am, you should start there. I sincerely hope this enables your painting and was enjoyable as well. Drop me a mail and let me know how these plans work for you and send me a picture so I can add it to the easel gallery... Sincerely, |
|